

An insulated garden shed can be a usable workshop, hobby room or winter potting space from October to March, rather than a cold, damp box you dash into for the lawnmower. The work is not complicated, but the order of the layers matters more than the insulation you buy. Get the air gap and the vapour control wrong and you trade a cold shed for a mouldy one, with rotting boards hidden behind your nice new lining.
This covers whether your shed is worth insulating, which materials suit a typical shed frame, how to build up the walls, roof and floor, and the rules that apply once it starts to look like a room.
Is your shed worth insulating?
Start outside, not with the insulation. Insulating a shed that leaks or sits on damp ground only traps the problem inside. Check four things first:
- The base. The shed should sit on a level, well-drained base off the soil: a concrete slab, paving, a timber frame on bearers or ground screws. If the floor bearers are wet or soft, deal with that first.
- The roof. Old torn felt will let water run straight into the insulation. If it needs replacing, do it before you insulate; our shed roof guide compares felt, EPDM and corrugated sheets by pitch.
- The cladding. Thin overlap boards (the cheapest sheds) are draughty, flex and let water through in driving rain. Tongue-and-groove or shiplap cladding is a far better starting point.
- The frame depth. Measure the depth of the wall studs and roof rafters. This sets how much insulation fits without building out the walls.
If the shed is small, has overlap cladding and a rotten floor, the honest answer is often that it is cheaper to buy a new tongue-and-groove shed, or an insulated log cabin, than to rescue it.
Which insulation to use in a shed
Three materials cover almost every shed project.
PIR foam boards
Rigid polyisocyanurate (PIR) boards, usually foil-faced on both sides, are the most common choice for sheds and garden rooms. Their thermal conductivity is typically around 0.022 to 0.026 W/mK, which is lower than mineral wool, so you get more insulation into a shallow shed frame. They are also light, easy to cut with a fine saw or a long knife, and they do not slump. Tape the joints with foil tape and seal the edges with expanding foam.
Mineral wool or glass wool
Rolls and batts of mineral wool are cheaper per square metre and friction-fit neatly between studs. They need more depth for the same performance and must be kept dry, because wet wool loses most of its insulating value. Cut batts slightly wider than the gap so they hold themselves in, and do not squash them. Wear gloves and a dust mask when cutting.
Multifoil and bubble foil
Thin reflective quilts are fast to staple up and useful for a shed you only want to take the edge off, or on a door where there is no depth. On their own they are much less effective than PIR or wool of normal thickness in a shed frame, so treat them as a budget option for seasonal use rather than a year-round workshop.
As a rule of thumb, use the deepest insulation your frame allows while still leaving the air gap described below. Many sheds have studs somewhere around 45mm to 50mm deep. Some suppliers suggest simply matching the board to the stud depth, but if your cladding is untreated or thin, it is safer to fix a thinner board and keep a gap behind it.
How to insulate the walls
The build-up from outside to inside is: cladding, an air gap, insulation, a vapour control layer, then the lining board.
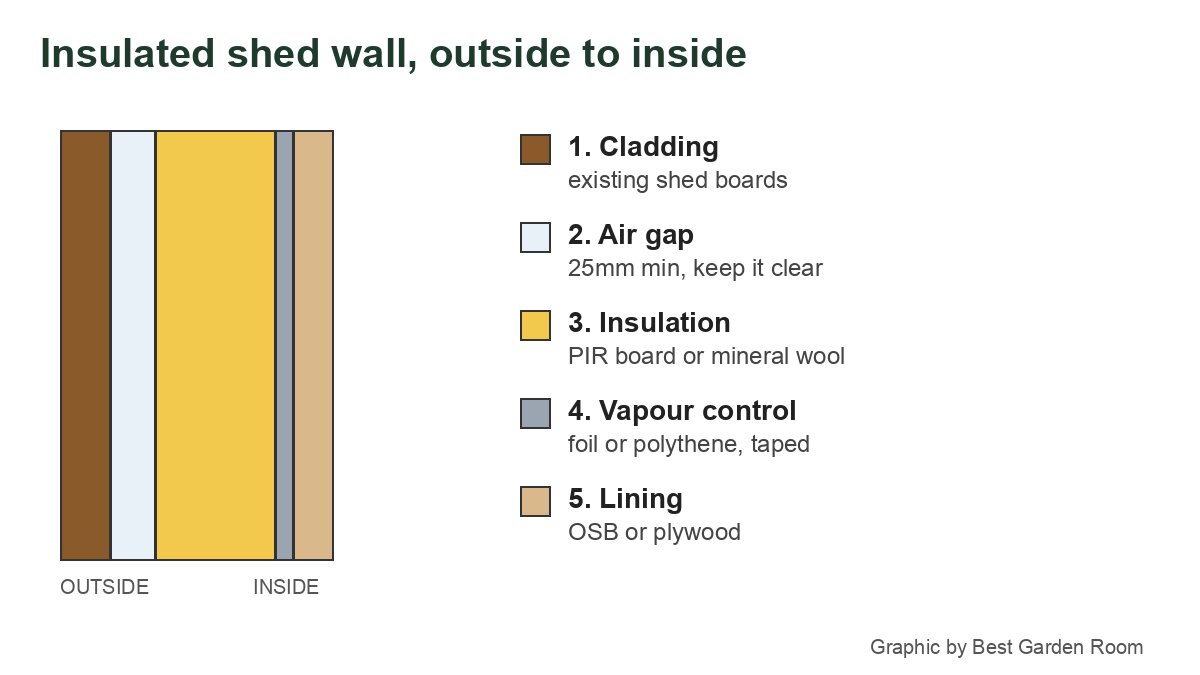
- Air gap. Leave at least 25mm between the back of the cladding and the insulation. This lets any moisture that gets through the boards dry out instead of soaking into the insulation. Small timber battens fixed to the inside of the cladding, or offcuts nailed to the sides of the studs, will hold the boards off.
- Insulation. Fit PIR boards or wool snugly between the studs. Fill gaps around the edges with expanding foam or tape, because a draught path around the insulation undoes much of its value.
- Vapour control layer. Staple polythene or a foil vapour control membrane over the studs on the warm, inside face. Overlap sheets by at least 100mm and seal every overlap and staple hole with tape. With foil-faced PIR, taping the board joints carefully does much of this job, but a continuous membrane is easier to get airtight.
- Lining. Screw OSB or plywood over the top. OSB or plywood are better than plasterboard in a workshop because you can fix shelves and tool racks anywhere, and they shrug off knocks.
Condensation: the vapour barrier and ventilation
A warm, occupied shed produces moisture: your breath, damp coats, a paraffin or gas heater (which adds a lot of water vapour), a kettle, or drying paint. When that warm, moist air reaches a cold surface, it condenses. Without a vapour control layer, that surface is the back of the cladding, hidden behind your insulation, where it rots the timber unseen.
The vapour control layer always goes on the warm side. Putting polythene on the cold side, against the cladding, traps moisture inside the insulation and is the classic mistake.
Insulation does not remove the need for ventilation. Keep, or add, a small vent high on one wall and a low vent on the opposite wall so air can move through. An electric heater is a better match for an insulated shed than a gas or paraffin one because it adds no moisture. Our guide to condensation and damp in garden rooms goes into the same problem in a bigger building.
How to insulate the roof and floor
Roof
Fit insulation between the rafters, leaving a gap of at least 50mm between the insulation and the underside of the roof boards so the roof void can ventilate. Then fit the vapour control layer and a plywood or OSB ceiling. On a small shed, a flat ceiling across the ties can be simpler and gives you a warmer, smaller volume to heat.
Floor
For an existing shed, the easiest method is a false floor on top of the old one: a damp-proof membrane over the existing boards, rigid PIR boards laid tightly across the whole floor, then a new floor of tongue-and-groove chipboard or plywood screwed through to the joists. It raises the floor by the thickness of the boards plus the new deck, so check the door will still open.
If you are building a new shed or can lift the floor, fit PIR between the joists on battens, with a membrane on top before the deck goes down. Treat the joists against rot first.
Windows, doors and the gaps you forget
Single-glazed shed windows and thin ledged-and-braced doors lose heat fast. Draught-strip the door, seal round window frames with a flexible sealant, and consider fitting secondary glazing or replacing styrene panes with toughened glass. Look up into the eaves too: the gap where the roof meets the walls is often wide open.
Planning, building regulations and electrics
Insulating a shed does not in itself need planning permission. What matters is the size, position and use of the building, which we cover in planning permission for garden sheds.
For building regulations in England and Wales, Schedule 2 of the Building Regulations 2010 exempts a detached single-storey building with no sleeping accommodation if its floor area is under 15m², or up to 30m² if it is at least one metre from the boundary or built substantially of non-combustible material. Once you add a bed, or it crosses those thresholds, building regulations come into play.
Plan any wiring before the lining goes on, so cables can run in the stud spaces. New circuits to an outbuilding are notifiable electrical work in England and should be done by a registered electrician; see our garden room electrics guide.
Insulated shed, or something bigger?
A well-insulated shed makes a good winter workshop, a place to overwinter plants or a hobby space. If you want an office you will sit in eight hours a day, with steady warmth, a proper floor and no draughts, a purpose-built insulated garden room will be more comfortable and cheaper to heat. Our garden room insulation guide shows how the specification differs, and Best Garden Room has more on choosing between the two.
Frequently asked questions
What is the best insulation for a garden shed?
For most sheds, foil-faced PIR boards give the most insulation in a shallow frame. Mineral wool is cheaper and works well if you have the depth and can keep it dry. Bubble foil suits light, seasonal use only.
Do I need a vapour barrier in a shed?
Yes, if you plan to heat it or spend time in it. Fit a vapour control layer on the warm, inside face of the insulation and tape every overlap, or moisture will condense on the back of the cladding.
Should I leave a gap behind shed insulation?
Yes. Leave at least 25mm between wall insulation and the cladding, and at least 50mm under the roof boards, so moisture can dry out rather than soaking into the insulation.
How thick should shed insulation be?
As thick as the frame allows while keeping the air gap. In many sheds that means boards of around 25mm to 50mm in the walls. For more, add battens inside the frame to create extra depth.
Can I insulate a shed with overlap cladding?
You can, but overlap boards are thin and let in wind and rain, so the insulation is more likely to get damp. Fit a breathable membrane against the cladding and keep a generous air gap, or consider a tongue-and-groove shed instead.
Does an insulated shed need planning permission?
Insulation itself does not. Planning depends on the shed’s size, height, position and use, and building regulations depend on floor area, boundary distance and whether anyone sleeps in it.
Related guides
- Garden Room Planning Permission UK: The 30m² and 50% Rules Explained
- How Much Does a Garden Room Cost to Run in Winter? Real UK Figures
- Garden Room vs Extension: Honest Cost, Value and When Each Wins
- How Much Does It Cost to Run Electrics to a Garden Room in 2026?
- Ground Screws vs Concrete Base: Which Garden Room Foundation Is Right for You?
- Do Garden Rooms Need Building Regulations? The 15, 30 and 1m Rules Explained
- Prefab vs Bespoke Garden Rooms: Which Is Right for You?
- Garden Room Buying Mistakes: 12 Costly Errors to Avoid
- Garden Room News: June 2026
- How to Buy a Garden Room: The Complete UK Buyer’s Guide (2026)
- What to Look for in a Garden Room: 15 Things to Check Before You Buy
- Buying a Second-Hand Garden Room: Is It Worth It?
- Garden Room Kits vs Fully Installed: Should You Self-Build or Buy Turnkey?
- Garden Room Deposits, Contracts and Deliverables: Protecting Your Money
- How Long Does a Garden Room Last? Lifespan and Maintenance
- Garden Room Cost Per Square Metre: 2026 UK Rates Explained
- How Much Does a Garden Room Cost in the UK? (2026 Price Guide)
- Garden Room Prices by Size: From 3x3m to 8x4m and Beyond
- How Much Does a Garden Office Cost? (2026 UK Breakdown)
- Garden Room Planning News: Late June 2026
- How Much Does a Garden Room with a Bathroom Cost?
- Hidden Garden Room Costs: Foundations, VAT and the Extras Quotes Miss
- Garden Room Finance: Loans, Mortgages and Payment Options Explained
- Garden Room News: Early July 2026
- Do Garden Rooms Add Value to Your House? What the UK Resale Data Shows
- Permitted Development Rights for Garden Rooms: Size, Height and the 2m Boundary Rule
- Do Garden Rooms Affect Council Tax? Business Rates and Reassessment
- Garden Room News: Mid-July 2026
- How a Garden Room Is Built: Foundations to Finish (UK Guide)
- SIPs vs Timber Frame Garden Rooms: Which Construction Is Better?
- How Close to a Boundary Can a Garden Room Be? UK Rules Explained
- How to Apply for Garden Room Planning Permission: Step by Step
- Can You Build a Garden Room on Decking, Slabs or a Patio?
- Is a Garden Room Cheaper Than an Extension? 2026 Cost Comparison
- Garden Room News: Mid-July 2026
- Garden Room Cladding: Cedar vs Composite vs Larch vs Render
- Garden Room Roof Guide: Flat vs Pitched and the Best Materials
- Garden Room Windows and Doors: Bifold, Sliding and Glazing
- How to Build a Garden Room: A DIY Step-by-Step Guide (UK)
- How Long Does It Take to Build a Garden Room?
- How to Make a Garden Room Usable All Year Round
- Garden Room Insulation: Best Materials and U-Values for the UK
- How to Heat a Garden Room: 9 Options Compared by Cost and Warmth
- Best Heating for a Garden Office: Warm Without a Huge Bill
- Air Conditioning for Garden Rooms: Cooling and Heating in One
- Stopping Condensation and Damp in a Garden Room (UK Guide)
- How to Get Wi-Fi in a Garden Office: 6 Ways That Actually Work
- Garden Office Ideas: Designing the Perfect Work-From-Home Space
- Garden Room Ideas: 20 Popular Uses to Inspire Your Build
- Garden Room Annexe: Rules, Costs and How to Build One
- Garden Bar Ideas: The Height Rules, Power and Layout
- Garden Room Business: What Changes Once Clients Visit
- Garden Studio Ideas: Sizes, Light and the 2.5m Rule
- Garden Room Lighting: IP20 Inside, IP65 Out, Part P Rules
- Landscaping Around a Garden Room: the 30cm Decking Trap
- Garden Room Design: Why 2.5m Decides Everything
- Garden Room Planning Permission: the 2.5m Boundary Rule
- Garden Room News: New NPPF Lands, PD Rules Unchanged
- Garden Saunas UK: Planning, Building Regs and Electrics
- Best Garden Room Companies UK: Guarantees of 10 to 25 Years
- Garden Room Electrics: The Rules Change on 15 Oct 2026
- Golf Simulator Garden Room: The 2.5m Rule That Stops It
- Garden Screens: the 2m Rule, and Why Trellis Counts
- Cheap Garden Rooms: What 19mm Walls Really Get You
- Green Retreats Review: 12-Year Cover, 60% Upfront
- Booths Garden Studios Review: Steel Build, 25 Years
- Eden Garden Rooms Review: £23,500 Start, 10-Year Cover
- Green Retreats vs Booths: 25-Year Steel or Timber?
- Garden Rooms London: 6 Companies and the 2.5m Limit
- Garden Room Bedroom: Why a Bed Changes the Rules
- Do I Need Planning Permission for a Garden Shed? Usually Not
- Garden Room News: Staged Payments Arrive, Timber Stays Dear
- Garden Gym Ideas: Sizes, Ceilings and the 2.5m Height Rule
- Garden Gazebo Rules: 2.5m Near a Boundary, 4m Max
- Garden Arch: Wood or Metal, and the 2.7m Height Rule
- Garden Arbour: Sizes That Seat Two, and Wood vs Metal
- Wooden Garden Gates: Sizes, UC4 Posts and the 1m Rule
- Garden Room News: Rates Held, Materials Up 5.9%
- Summer House Interior Ideas: 9 That Work in Winter
- Garden Trellis Panels: the 2m Rule Most Buyers Miss
- Garden Shelters: Six Types and When You Need Permission
- Garden Greenhouses: Glass Gives 90% Light, Plastic 80%
- Summer House Doors and Windows: 4mm Toughened or Styrene?
- Log Stores: Size, Siting and the 20% Moisture Rule
- Garden Shed Roof: Felt, EPDM or Onduline by Pitch